Pourquoi Adalo fonctionne pour la création d'applications immobilières
Adalo est un créateur d'applications sans code pour les applications web pilotées par base de données et les applications iOS et Android natives, une seule version sur les trois plateformes, publiée sur l'Apple App Store et Google Play. C'est la solution parfaite pour les professionnels de l'immobilier qui ont besoin de gérer des bases de données de propriétés complexes, des informations sur les clients et les détails des annonces, tout en offrant une expérience transparente aux acheteurs et aux vendeurs sur tous les appareils.
Pour les applications immobilières en particulier, la distribution via l'app store est essentielle : vos clients s'attendent à trouver votre application aux côtés des grandes plateformes comme Zillow et Redfin. Avec les notifications push natives, vous pouvez alerter instantanément les acheteurs lorsqu'une propriété correspondant à leurs critères arrive sur le marché ou rappeler aux vendeurs les visites à venir, en gardant votre entreprise à l'esprit et en générant un engagement que les solutions Web uniquement ne peuvent tout simplement pas égaler.
Les agents immobiliers sont confrontés à un défi constant : rester en contact avec les acheteurs et les vendeurs tout en gérant des dizaines d'annonces immobilières, en planifiant les visites et en conclant des transactions. Une application mobile dédiée met toute votre entreprise dans la poche de vos clients, mais le développement d'applications traditionnel coûte des dizaines de milliers de dollars et prend des mois à réaliser.
Adalo, un créateur d'applications alimenté par l'IA, élimine complètement ces obstacles. La plateforme crée des applications iOS et Android natives à partir d'une seule base de code, en les publiant directement sur l'Apple App Store et Google Play Store. Pour les professionnels de l'immobilier, cela signifie que les clients peuvent consulter les annonces en déplacement, recevoir des notifications push lorsque de nouvelles propriétés arrivent sur le marché et vous contacter instantanément, le tout par le biais d'une application qui ressemble et fonctionne comme si elle avait été créée par une équipe de développement professionnelle.
Avec plus de 3 millions d'applications créées sur la plateforme et un générateur visuel décrit comme « aussi facile que PowerPoint », Adalo est devenu la solution de référence pour les professionnels qui ont besoin d'applications puissantes sans la complexité technique. Avant de vous lancer dans le processus de création, assurons-nous que vous avez tout planifié pour réussir.
Pourquoi Adalo fonctionne pour la création d'applications immobilières
L'architecture d'Adalo est spécialement conçue pour les applications riches en données comme les plateformes immobilières. L'infrastructure modulaire de la plateforme s'adapte pour servir les applications avec des millions d'utilisateurs actifs mensuels, sans plafond supérieur sur la croissance. C'est important pour les applications immobilières qui peuvent commencer avec une poignée d'annonces mais croître à des milliers de propriétés et d'utilisateurs au fil du temps.
Ada, le créateur IA d'Adalo, vous permet de décrire ce que vous voulez et génère votre application. Magic Start crée des fondations d'applications complètes à partir d'une description, tandis que Magic Add ajoute des fonctionnalités en langage naturel.
Contrairement aux enveloppes web qui rencontrent des problèmes de performance sous charge, Adalo compile en véritable code natif. Votre application immobilière fonctionne avec la vitesse et la réactivité que les clients attendent des applications professionnelles. Les fonctionnalités assistées par l'IA de la plateforme, notamment Magic Start pour générer des fondations d'applications complètes et Magic Add pour construire des fonctionnalités à partir de demandes en langage naturel, accélèrent le développement de mois à jours.
Avant de créer votre application immobilière : planification
Comme tout professionnel commençant un nouveau projet, vous aurez besoin d'un plan concret pour vous assurer qu'aucune idée n'est gaspillée. Votre plan servira de plans à votre application, et vous devriez l'avoir à vos côtés pendant la création.
Assurez-vous d'avoir les éléments suivants avant de commencer :
- Des croquis de l'apparence de votre application : Prenez du papier et un crayon (ou votre iPad). Dessinez chacun des écrans de votre application et notez ce que vous voulez que chaque écran contienne.
Par exemple, voulez-vous votre logo en haut de chaque écran ? Quels écrans auront des listes et des formulaires d'inscription ? Aurez-vous une carte de vos propriétés ? Quelles couleurs voulez-vous utiliser ?
Cela inspirera des idées pour l'esthétique de votre application, facilitant le processus de création d'applications.
- Les actions de votre application : Les actions sont les tâches et les travaux que votre application exécutera. Posez-vous la question : Vos utilisateurs pourront-ils vous appeler directement à partir de l'annonce ? Voulez-vous une fonction de chat pour que vos clients puissent vous contacter immédiatement ? Et une calculatrice hypothécaire ?
Reprenez les croquis d'écran que vous venez de dessiner et énumérez les actions que votre application peut exécuter sur chacun d'eux. Énumérer les actions et où elles se produisent devrait aboutir à une création d'application plus organisée et logique, vous aidant à éviter la frustration.
- Une adhésion Adalo: Adalo utilise une interface intuitive de glisser-déposer qui vous permet de concrétiser n'importe quelle idée d'application. Et vous n'avez pas besoin n'importe quel de codage ou de compétences techniques.
Commencez par vous inscrire à la version gratuite d'Adalo, qui vous permet de vous familiariser avec son interface de création. Parce qu'Adalo privilégie la simplicité, vous pouvez commencer à créer votre application immédiatement après votre inscription. La plateforme vous permet également de créer une application d'aspect professionnel qui attirera l'attention de vos clients.
Comment fonctionne une application agent immobilier : les composants
Avant de nous plonger dans les détails de la création de votre application, voici un aperçu des composants présents dans tous les types d'applications. Toutes les applications, qu'il s'agisse d'applications d'agents immobiliers, d'applications de restaurants ou d'applications d'actualités, sont composées de ces parties :
- L'interface utilisateur : C'est la partie de l'application que tout le monde voit : les écrans, les couleurs, le texte, les images et bien d'autres choses constituent l'interface de votre application. En fait, en lisant cet article, vous regardez une interface en ce moment.
Avoir une interface esthétiquement agréable et logiquement structurée est crucial pour l'expérience utilisateur (UX) de votre application.
- L'arrière-plan : Votre backend est où votre application « pense ». Il est responsable de l'extraction de données, comme les informations de prix des maisons, les images et bien d'autres. Le backend se connecte également à d'autres applications comme Zapier et Zillow et recueille les données de celles-ci.
- La base de données : Bien qu'il fasse partie du backend, c'est assez crucial pour avoir sa propre mention. La base de données stocke toutes les informations de votre application afin que votre backend puisse les mettre à la disposition de l'utilisateur.
Certaines des données que vous trouverez dans la base de données de votre application immobilière :
- Images de toutes vos propriétés
- Détails de chaque annonce
- Propriétés à vendre et propriétés à louer
- Informations sur les propriétés, comme la superficie, la date de construction, le nombre de pièces, une description, etc.
- Informations de profil utilisateur
- Toute information personnalisée que vous souhaitez ajouter
Adalo est livré avec sa propre base de données facile à utiliser. Elle est intégrée à votre application, vous n'avez donc pas à vous soucier de la connecter à vos écrans. Votre backend fonctionne automatiquement, stockant les données utilisateur nouvellement saisies et récupérant les informations demandées instantanément.
De manière critique, les plans payants incluent des enregistrements de base de données illimités—aucune limite sur le nombre d'annonces immobilières, de profils utilisateur ou de dossiers de transactions que vous pouvez stocker. Cela supprime une contrainte courante qui oblige les professionnels de l'immobilier à supprimer les anciennes données ou à passer à des niveaux d'entreprise coûteux sur d'autres plateformes.
Comment créer une application immobilière en 7 étapes faciles
Une fois que vous avez vos croquis en ordre et une liste des fonctionnalités de votre application, il est temps de passer à l'essentiel de votre projet : Utiliser Adalo pour créer votre propre application !
Lors de la création de votre application, vous pourriez rencontrer quelques questions techniques ou vous retrouver bloqué. Ne vous inquiétez pas ; Adalo vous couvre avec son écosystème florissant rempli de documents d'aide, de tutoriels vidéo et d'avis d'experts. Découvrez l'écosystème d'Adalo ici :
- L'Académie Adalo : Adalo Academy propose des cours en ligne, des formations et des tutoriels pour vous amener au niveau expert lors de l'utilisation de l'interface de création d'Adalo.
- Forum communautaire d'Adalo : Laissez les vétérans expérimentés d'Adalo répondre aux questions que vous posez sur le forum de discussion.
- Documents : Si vous souhaitez approfondir les nuances de la connexion aux API, de l'intégration avec des applications tierces comme Zapier, de la publication sur les app stores, et plus encore, consultez simplement la riche documentation d'Adalo.
C'est l'heure de la création, allons-y !
Étape 1 : Modèle d'application d'agent immobilier d'Adalo
Adalo permet aux utilisateurs de choisir des modèles, qui sont des modèles de leurs applications qu'ils peuvent modifier et personnaliser à leur goût lorsqu'ils commencent la création. Convenablement, Adalo a déjà un modèle d'application immobilière.
Une fois que vous sélectionnez le modèle, il s'ouvrira dans votre interface de création d'application. Le modèle immobilier d'Adalo a plusieurs écrans, chacun montrant une propriété distincte et des informations pertinentes comme le nombre de chambres, de salles de bain, et plus encore. Vous trouverez également un écran de connexion utilisateur et un écran qui permet aux utilisateurs de télécharger leurs propres propriétés.
Ne vous inquiétez pas si son apparence ne vous plaît pas—vous aurez tout le pouvoir et la liberté de conception pour créer votre application de manière unique selon vos goûts. Vous pourrez également remplacer toutes les informations de propriété préchargées par les données de vos propres propriétés.
Pour une configuration encore plus rapide, Magic Start peut générer une fondation d'application complète à partir d'une simple description. Dites-lui que vous avez besoin d'une application immobilière avec des annonces de propriétés, des filtres de recherche et des fonctionnalités de contact avec l'agent, et elle crée votre structure de base de données, vos écrans et vos flux utilisateur automatiquement—ce qui prenait autrefois des jours de planification se fait maintenant en minutes.
Étape 2 : Utiliser l'interface de création d'Adalo pour concevoir et personnaliser votre application immobilière
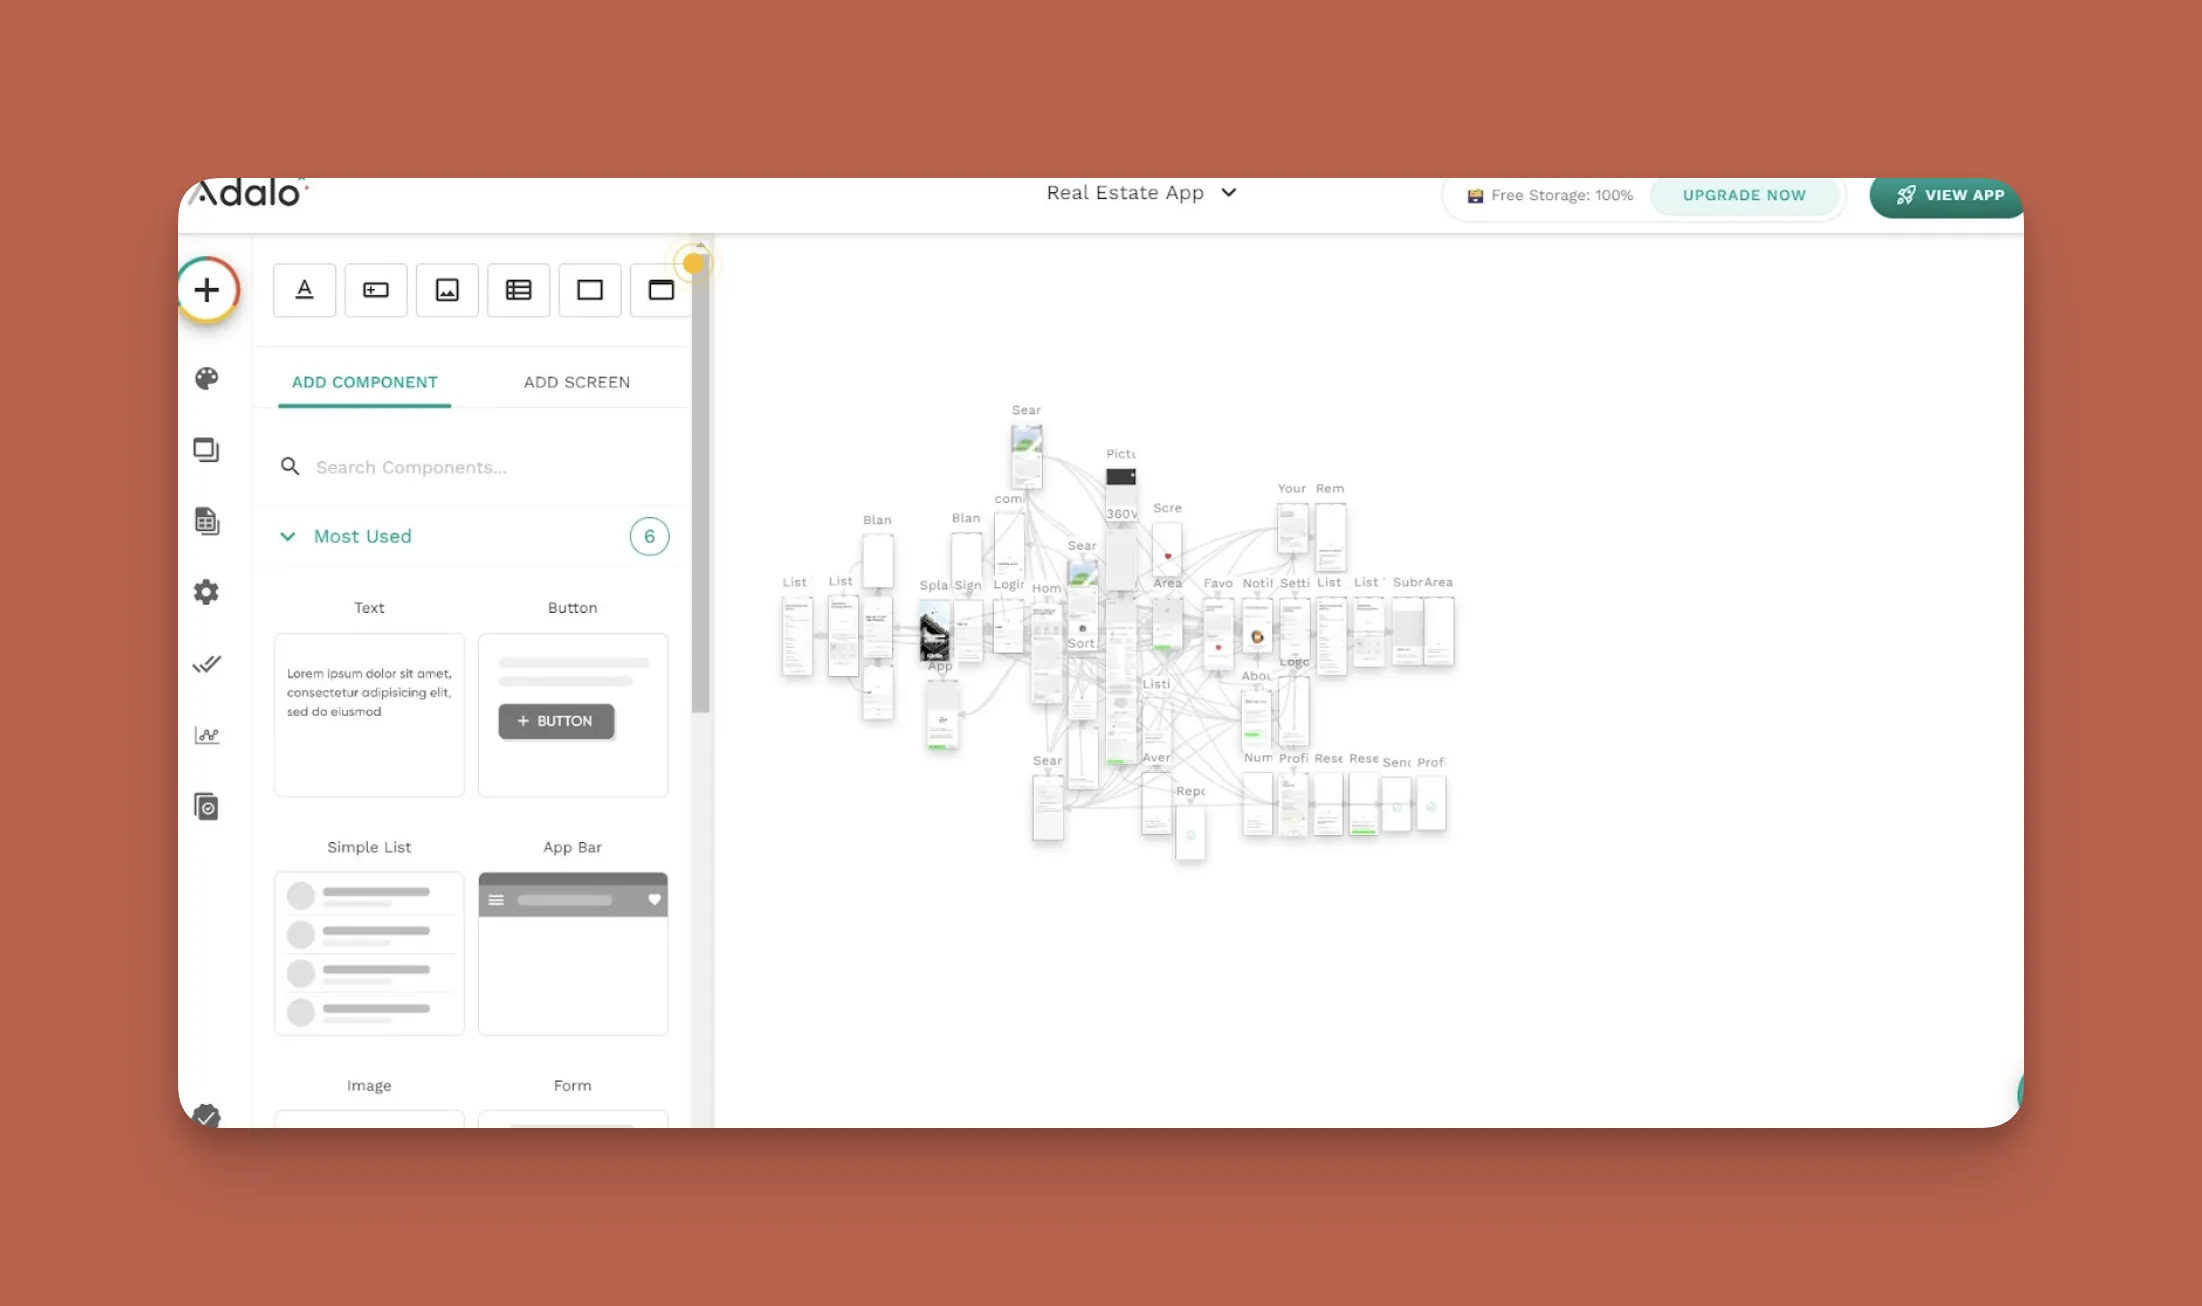
Avant de commencer à assembler votre application, examinons votre boîte à outils : L'interface de création d'Adalo. Vos outils les plus importants se trouvent dans le menu déroulant de gauche—vous les utiliserez pour créer, personnaliser et modifier votre application.
Au centre de votre création d'applications interface, vous trouverez votre zone de création. Adalo place convenablement tous les écrans sur votre canevas à la fois—jusqu'à 400 écrans visibles simultanément si nécessaire—et vous permet de sélectionner et modifier des écrans individuels en passant le curseur sur chaque écran.
Cliquez sur l'écran, et vous pourrez le modifier dans la boîte qui s'affiche sur le côté gauche de votre écran. Voici un aperçu de vos outils :
Ajouter des éléments et des écrans : Appuyez sur ce bouton pour ajouter ou modifier des écrans et des éléments tels que des listes, des formulaires, des boutons, et plus encore.
Marque : Utilisez ceci pour appliquer différentes couleurs et polices à votre application.
Écrans : Ceci affiche une liste de tous vos écrans, afin que vous puissiez y accéder facilement.
C'est exactement ce que cela semble être—c'est là qu'Adalo enregistre et sauvegarde toutes les informations de vos utilisateurs. Nous en parlerons davantage dans l' Ceci est votre base de données spécialisée intégrée, fournie par Adalo. Nous en parlerons plus tard.
C'est ici que vous pouvez renommer votre application, rédiger une brève description pour l'App Store Apple et Google Play Store, ajouter des clés API et donner accès à des collaborateurs si des personnes vous aident à créer votre application. Ceci est la fonction de « maintenance » de votre application, qui vous permet de modifier le nom de votre application, d'écrire une méta-description pour le web et de brancher les clés API pour la collecte de données.
Publier : Utilisez ceci quand vous avez terminé la création et que vous souhaitez publier votre application sur l'App Store d'Apple, Google Play Store et le web. Nous nous plongerons dans la publication à l'étape 6.
Analyses : Découvrez les utilisateurs de votre application, leurs emplacements et les métriques clés concernant leurs performances.
Historique des versions : Vous voulez créer jusqu'à 10 versions différentes de votre application et publier celle que vous préférez ? Vous pouvez les créer et y accéder ici.
Bricolez et expérimentez pour vous familiariser avec l'interface de création d'Adalo. N'oubliez pas, si vous êtes bloqué ou avez des questions, vous avez accès à un trésor de connaissances !
Étape 3 : Créer la base de données de votre application
Cliquez sur l'icône de base de données trouvée sur le tableau de bord déroulant de gauche. Tous les composants de votre base de données apparaîtront dans une nouvelle boîte à votre gauche. Votre base de données se compose de deux éléments: les collections et les propriétés.
Les collections sont des groupes spécifiques de données, comme les utilisateurs, les maisons, les chambres, les salles de bain, et plus encore.
Propriétés sont les éléments au sein de chaque collection, tels que le nom d'utilisateur, le type de maison (maison de ville, appartement, etc.), le nombre de chambres, et plus encore.
Vous pouvez afficher et modifier vos propriétés et vos collections en cliquant d'abord sur les points verticaux, puis en cliquant sur « Afficher/Modifier les enregistrements ».
Pour les professionnels de l'immobilier qui suivent déjà les annonces dans des feuilles de calcul, la fonction SheetBridge d'Adalo connecte vos feuilles Google Sheets existantes directement à la base de données de votre application. Cela fournit le contrôle le plus facile sans apprentissage lié à la base de données—votre feuille de calcul devient la source de données de votre application, se mettant à jour en temps réel à mesure que vous ajoutez ou modifiez des annonces.
Avec les bons paramètres de relation de données, les applications Adalo peuvent évoluer au-delà 1 million d'utilisateurs actifs mensuels. L'infrastructure modulaire de la plateforme se développe avec votre entreprise, que vous gériez 50 annonces ou 5 000.
Étape 4 : Ajouter de nouveaux écrans et éléments et supprimer les éléments indésirables
Bien que le modèle Adalo dispose de tous les écrans dont vous avez besoin pour créer une application immobilière exceptionnelle, nous le comprenons : votre conception d'application pourrait différer de ce que le modèle propose. Nous ne pouvons pas assez insister sur la personnalisabilité d'Adalo.
Suppression d'écrans et d'éléments
Pour supprimer des écrans, appuyez sur le bouton « Écrans » de votre tableau de bord déroulant gauche. Cliquez sur les trois points verticaux et sélectionnez supprimer. La suppression d'éléments fonctionne de la même manière : Sélectionnez votre écran, puis survolez votre curseur au-dessus de l'élément jusqu'à ce qu'un contour jaune apparaisse (cela prend moins d'une seconde).
Les propriétés de l'élément apparaîtront alors dans la boîte d'édition à votre gauche. Cliquez sur les trois points verticaux, sélectionnez supprimer, et réjouissez-vous que l'élément qui vous ennuyait ait été supprimé.
Ajouter des écrans, des éléments, et plus
Vous pouvez ajouter des éléments et des écrans en appuyant sur le bouton coloré. Il contient une bonne sélection de listes, d'éléments, de formulaires, et plus encore que vous pouvez ajouter à votre application en les faisant simplement glisser vers l'écran souhaité.
Personnalisez la taille de l'élément en passant votre souris sur le bord de l'élément. Vous pouvez également modifier le style et la couleur en cliquant sur l'élément et en le personnalisant à l'aide du tableau de bord déroulant à votre gauche.
Magic Add accélère encore ce processus. Au lieu de chercher dans les menus, décrivez ce que vous voulez : « Ajouter un calculateur hypothécaire qui affiche les paiements mensuels en fonction du prix d'annonce. » L'IA génère le composant avec la logique et le style appropriés, prêt à être personnalisé.
Étape 5 : Aperçu de Votre Application
Si vous souhaitez voir comment votre application apparaîtrait en direct à tout moment pendant le processus de création, appuyez sur le bouton vert « Aperçu de l'application » dans le coin supérieur droit de votre écran. Vous pouvez même sélectionner un appareil pour afficher votre application, comme un iPhone 15 ou un Samsung Galaxy S20.
Lorsque vous prévisualisez votre application, vous pouvez la parcourir comme si vous l'utilisiez réellement. Cela vous donnera une très bonne idée de votre expérience utilisateur. Notez les problèmes que vous rencontrez et corrigez-les après avoir terminé l'aperçu.
X-Ray, l'outil d'analyse des performances d'Adalo, identifie les problèmes potentiels avant qu'ils n'affectent les utilisateurs. Il met en évidence les requêtes de base de données qui pourraient ralentir à mesure que votre nombre d'annonces augmente, vous aidant à optimiser l'architecture de votre application de manière proactive plutôt que réactive.
Vous pouvez également partagez votre application avec d'autres en utilisant le bouton « Aperçu de l'application ». Sélectionnez « Partager votre application » dans le menu déroulant, copiez et collez le lien, et envoyez-le à vos amis ou clients. C'est un excellent moyen d'obtenir des commentaires utilisateur de qualité avant de publier sur les app stores.
Étape 6 : Publier votre application d'agent immobilier dans les app stores
Avant de publier sur l'app store, vous devrez vous assurer que vous disposez d'une annonce d'app store attrayante. Voici ce qui figurera dans votre annonce d'app store :
- Une icône d'application : Ceci apparaîtra sur le côté gauche de votre titre d'application. Assurez-vous de concevoir une icône unique et accrocheuse. Consultez Looka pour concevoir votre icône.
- La description et l'en-tête de votre application : Avant de rédiger votre description, faites un peu de recherche en recherchant des mots clés comme « applications d'agent immobilier » ou « applications immobilières » dans les app stores. Prêtez attention à la façon dont vos concurrents décrivent leurs applications, et essayez de mieux décrire la vôtre.
- Captures d'écran professionnelles : Cela va sans dire, mais vous voudrez présenter votre application sous un jour professionnel. Faites-le en incluant des captures d'écran qui montrent clairement les fonctionnalités et les fonctions de votre application.
Pour un guide plus détaillé sur la commercialisation de votre application, consultez notre guide de promotion d'application.
Après avoir déterminé comment présenter votre application dans les app stores et après avoir obtenu les commentaires des utilisateurs et apporté quelques ajustements finaux, il est temps de publier votre application dans l'Apple App Store et le Google Play Store.
Les deux app stores ont des procédures de publication différentes, et nous vous donnerons un bref aperçu des deux.
Procédures du Google Play Store
Pour commencer, vous devrez créer un compte développeur Android. Suivez les instructions, payez les frais de configuration uniques de 25 $, et remplissez toutes les informations requises. Vous aurez la possibilité d'intégrer des personnes qui peuvent tester votre application et fournir des commentaires, ce que nous recommandons vivement.
Après avoir réglé tout ce qui concerne votre compte développeur Android, retournez à Adalo et appuyez sur le bouton « Publier ». Vous devrez fournir certaines informations, comme votre clé développeur Android, pour terminer le processus de publication du côté Adalo.
Une fois que vous avez terminé, vous pouvez soumettre votre application à la Google Play Console pour publication. La publication sur le Google Play Store peut prendre quelques heures à plusieurs jours.
Procédures de l'Apple App Store
Tout comme avec Google, vous devrez créer un compte développeur iOS, suivre les instructions et payer les frais annuels de 99 $. Assurez-vous de vous inscrire à Testflight (vous pouvez le trouver via votre compte développeur iOS) pour recruter des personnes pour tester et offrir des commentaires sur votre application.
Une fois que vous avez réglé votre compte développeur iOS, retournez à votre compte Adalo, appuyez sur le bouton « Publier », et fournissez toutes les informations requises pour configurer votre application dans iOS.
Après avoir coché toutes les cases du côté Adalo, retournez à votre compte développeur iOS et soumettez votre application pour publication. Apple prend notablement plus de temps pour accepter les applications pour publication, de quelques semaines à quelques mois.
Un avantage clé : Adalo gère le processus complexe de soumission à l'App Store, vous permettant de vous concentrer sur les fonctionnalités et l'expérience utilisateur de votre application au lieu de lutter contre les certificats, les profils de provisionnement et les directives du store. Une seule version publie sur le web, iOS et Android—les mises à jour de votre application se déploient automatiquement sur les trois plates-formes.
Si vous avez des questions sur la publication de votre application, ne cherchez pas plus loin que le guide d'aide détaillé d'Adalo. Il couvre chaque petite étape impliquée dans la publication sur les app stores.
Étape 7 : Comment obtenir des paiements avec Stripe
Si vous avez besoin de recevoir des paiements de vos clients, comme pour un loyer ou des services, l'intégration Stripe d'Adalo est là pour vous ! Pour activer Stripe sur votre application, suivez ces 3 étapes simples :
- Après avoir configuré votre compte Stripe, cliquez sur le bouton « Ajouter des éléments et des écrans » dans Adalo. Faites défiler jusqu'au kit de paiement Stripe et installez-le.
- Dans la section « Composants », vous trouverez votre bouton Stripe. Glissez-le sur l'écran de votre choix et entrez toutes les informations requises.
- Vous êtes prêt à être payé !
Cette intégration est particulièrement précieuse pour les gestionnaires immobiliers collectant les paiements de loyer ou les agents traitant les dépôts. Le flux de paiement est sécurisé, professionnel et ne nécessite aucun codage supplémentaire ou configuration de paiement tiers.
Prochaines étapes : Analyses, utilisateurs et maintenance de votre application
Bien que vous ayez déjà publié votre application, votre travail est loin d'être terminé. Vous devrez obtenir plus d'utilisateurs en invitant des clients et en publiant sur vos comptes de médias sociaux. Suivez les conseils que nous donnons dans notre guide de marketing d'applications, comme lancer des publicités payantes.
Effectuez des vérifications quotidiennes de votre application en la parcourant pour vous assurer qu'elle fonctionne. Résolvez immédiatement tous les problèmes—si votre application commence à mal fonctionner, vos utilisateurs d'application et vos clients seront frustrés, et votre réputation professionnelle pourrait en souffrir.
Utilisez le le bouton « Analyses » pour suivre les utilisateurs et leur engagement, ce qui vous donnera des aperçus clés qui peuvent aider votre application à atteindre un public plus large.
N'oubliez pas de mettre à jour votre application régulièrement. Cela gardera votre application élégante et moderne—ce qui devrait garder les gens plus engagés à long terme. Avec les mises à jour d'application illimitées d'Adalo sur les forfaits payants, vous pouvez pousser les améliorations aussi souvent que nécessaire sans vous soucier des limites de republication ou des frais supplémentaires.
Comment Adalo se compare aux autres options de création d'applications
Les professionnels de l'immobilier évaluant les créateurs d'applications doivent comprendre comment différentes plates-formes gèrent les exigences spécifiques des applications de liste de propriétés : grandes bibliothèques d'images, filtres de recherche complexes et besoin d'une présence web et mobile.
Bubble offre une personnalisation étendue mais comporte des compromis. Commençant à 69 $/mois avec des frais basés sur l'utilisation, les Unités de charge de travail de Bubble peuvent créer des coûts imprévisibles à mesure que votre application se développe. La solution mobile de la plate-forme enveloppe l'application web plutôt que de compiler en code natif, ce qui peut introduire des défis de performance sous charge. De nombreux utilisateurs de Bubble construisant des applications complexes finissent par embaucher des experts pour optimiser les performances—les affirmations de millions d'MAU nécessitent souvent une aide professionnelle importante pour être réalisées.
Glide excelle dans les applications basées sur des feuilles de calcul avec des temps de configuration rapides, mais son approche axée sur les modèles limite la liberté créative. Commençant à 60 $/mois pour la capacité de domaine personnalisé, Glide limite toujours les mises à jour des applications et les lignes de données, avec des frais supplémentaires pour dépasser les limites. De façon critique pour les professionnels de l'immobilier, Glide ne prend pas en charge la publication sur l'App Store d'Apple ou le Google Play Store— votre application reste uniquement web.
FlutterFlow cible les utilisateurs techniques avec son approche low-code. Commençant à 70 $/mois par utilisateur pour la publication sur l'app store, la plate-forme exige que les utilisateurs recherchent, configurent et paient leur propre base de données séparément. Cela crée une complexité d'apprentissage importante, en particulier lors de l'optimisation pour la mise à l'échelle—une configuration suboptimale de la base de données peut créer des problèmes de performance qui nécessitent une intervention d'expert. L'affichage limité du créateur (affichant seulement 2 écrans à la fois) ralentit le développement par rapport au canvas d'Adalo qui peut afficher jusqu'à 400 écrans simultanément.
L'approche d'Adalo est fondamentalement différente. À 36 $/mois avec une utilisation illimitée et aucune limite d'enregistrements, la plate-forme inclut une base de données intégrée, une compilation native iOS et Android, et la publication directe sur l'app store. Une seule base de code met à jour les applications web, iOS et Android simultanément. La révision de l'infrastructure 3.0 (lancée fin 2025) a rendu les applications 3 à 4 fois plus vite avec une mise à l'échelle modulaire qui se développe avec votre entreprise.
Conclusion
La construction d'une application immobilière ne nécessite plus une équipe de développement ou un budget énorme. Avec une planification appropriée—esquissant vos écrans, énumérant les actions de votre application et comprenant la structure frontend/backend/base de données—vous pouvez créer une application professionnelle de liste de propriétés qui sert vos clients sur le web, iOS et Android.
Les sept étapes couvertes ici vous mènent de la sélection du modèle à la publication sur l'app store, avec des fonctionnalités assistées par l'IA accélérant chaque phase. Que vous soyez un agent indépendant présentant une douzaine d'annonces ou une agence immobilière gérant des milliers de propriétés, la plate-forme se développe avec vos besoins tout en maintenant les coûts prévisibles.
FAQ
Pourquoi choisir Adalo plutôt que d'autres solutions de création d'applications ?
Adalo est un créateur d'applications alimenté par l'IA qui crée de véritables applications iOS et Android natives. Contrairement aux wrappers web, il compile en code natif et publie directement sur l'App Store Apple et Google Play Store à partir d'une seule base de code—la partie la plus difficile du lancement d'une application gérée automatiquement. Avec des enregistrements de base de données illimités sur les forfaits payants et aucuns frais basés sur l'utilisation, les coûts restent prévisibles à mesure que votre application se développe.
Quel est le moyen le plus rapide de créer et de publier une application sur l'App Store ?
L'interface glisser-déposer d'Adalo combinée à la construction assistée par l'IA vous permet de passer de l'idée à l'application publiée en jours plutôt qu'en mois. Magic Start génère des fondations d'applications complètes à partir de descriptions, tandis que la plate-forme gère le processus complexe de soumission à l'App Store—les certificats, les profils de provisionnement et les directives du store sont gérés pour vous.
Puis-je facilement créer une application immobilière sans expérience en codage ?
Oui. Le créateur visuel d'Adalo est décrit comme « aussi facile que PowerPoint », ne nécessitant aucun codage ou compétences techniques. La plate-forme inclut un modèle immobilier prêt à l'emploi, et les fonctionnalités d'IA comme Magic Add vous permettent de décrire les fonctionnalités en langage courant plutôt que de les construire manuellement.
Combien de temps faut-il pour créer une application immobilière ?
Avec le modèle d'Adalo et les fonctionnalités assistées par l'IA, vous pouvez avoir une application immobilière fonctionnelle prête pour les tests en quelques jours. La publication sur Google Play Store prend des heures à des jours ; l'examen de l'App Store Apple prend généralement une à plusieurs semaines.
Combien coûte la construction d'une application immobilière avec Adalo ?
Les forfaits payants d'Adalo commencent à 36 $/mois avec une utilisation illimitée, des enregistrements de base de données illimités et la publication sur l'app store avec des mises à jour illimitées. Cela se compare favorablement à Bubble (69 $/mois avec des frais d'utilisation), Glide (60 $/mois sans publication sur l'app store) et FlutterFlow (70 $/mois par utilisateur plus les coûts séparés de la base de données).
Adalo fournit-il une base de données pour stocker les annonces immobilières ?
Oui, Adalo inclut une base de données intégrée automatiquement connectée à votre application. Les forfaits payants n'ont aucune limite d'enregistrements—stockez autant d'annonces immobilières, de profils d'utilisateurs et d'enregistrements de transactions que votre entreprise l'exige. SheetBridge vous permet également de connecter directement des Google Sheets existantes comme source de données.
Puis-je accepter des paiements via mon application immobilière ?
Oui, Adalo propose l'intégration Stripe pour collecter les paiements. Installez le kit de paiement Stripe, glissez le bouton de paiement sur votre écran et configurez les détails de votre compte. Cela fonctionne pour la collecte de loyer, les dépôts ou les frais de service.
Lequel est mieux pour les applications mobiles, Adalo ou Bubble ?
Pour les applications mobiles natives, Adalo a un avantage clair. Adalo compile en véritable code iOS et Android natif, tandis que la solution mobile de Bubble enveloppe l'application web. Cette différence architecturale affecte les performances sous charge et l'expérience utilisateur. Adalo offre également une tarification plus simple sans les calculs d'Unités de charge de travail de Bubble.
Puis-je publier à la fois sur l'App Store d'Apple et Google Play Store ?
Oui. Adalo publie sur les deux app stores à partir d'une seule base de code, et les mises à jour se déploient sur le web, iOS et Android simultanément. Certains concurrents comme Glide et Softr ne supportent pas du tout la publication sur l'app store.
Quelles ressources sont disponibles si je suis bloqué lors de la création ?
Adalo fournit l'Académie Adalo avec des cours et des tutoriels, un Forum communautaire où les utilisateurs expérimentés répondent aux questions, et une documentation détaillée couvrant les API, les intégrations et les procédures de publication. L'écosystème vous aide à devenir compétent rapidement sans embaucher de l'aide externe.
Créez votre application rapidement avec l'un de nos modèles d'application prédéfinis
Commencez à créer sans codeContenu connexe
La meilleure plateforme pour le développement d'applications sans code facile en 2026
Vous voulez créer votre propre application sans codage ? Lisez alors notre article sur Adalo, la meilleure plateforme pour le développement d'applications sans code.
Développement sans code : Qu'est-ce que le sans-code et est-ce pour vous ?
Vous créez votre propre application, site web, outil et logiciel en utilisant le sans-code. Vous voulez en savoir plus ? Lisez notre article sur le développement sans code !
Créer une application de livraison d'épicerie sans codage : un guide en 7 étapes
Vous voulez créer une application de livraison d'épicerie ? Apprenez à créer votre application en 7 étapes faciles avec Adalo, un générateur d'applications sans code.
![Comment créer une application web en 8 étapes simples [Aucun codage requis]](https://www.adalo.com/images/cdn/6656c654e47b88dc1e51208e_Adalo_Imagery.avif)
Comment créer une application web en 8 étapes simples [Aucun codage requis]
La création d'une application web sans code est plus facile que jamais. Lisez notre guide simple et apprenez à créer une application web en seulement 8 étapes simples.